Post by ©³~ SilentK on Jan 19, 2011 13:52:47 GMT -6
Hey, I finally got around to finishing part two of my CE tutorials "Adding tags to maps with Sapien and rebuilding", yay!
Anyways, if you haven't done my first tutorial, or at least extracted the tags you needed, this will not work.
STEP ONE: Preperation!
Ok, for step one open HEK+ The download link for this program is included in my other tutorial (I think), or get it HERE.
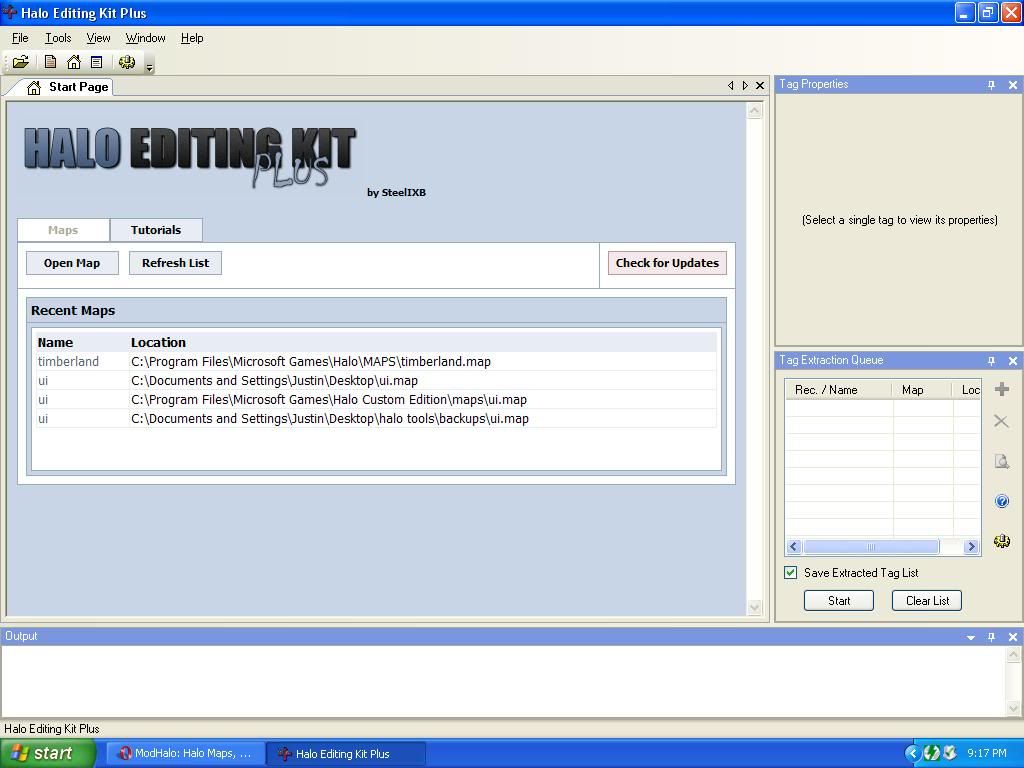
You should see something like this:
STEP TWO: Extraction!*
(*Optional step: if you are making/downloading your own tags, or have already extracted AI, skip this)
Ok, now we need to extract what we want to inject into our vanilla Halo map. THIS ONLY NEEDS TO BE DONE ONCE! Unless you screw up the tag and want to re-extract. If you already extracted the tags or you downloaded the tags, skip this whole step entirely.
So, to do this it is almost exactly the same as my other tutorial, if you don't want to go read it I will show how here. First, hit File > Open and browse to the HALO PC DIRECTORY! NOT CE! and choose the single player map that has the things you want in it. Once open, it should look almost exactly like this:

Now browse to what item you want. For this tutorial we will extract a simple Elite AI for our map. Browse to "Characters\Elite\Elite commander" so it looks like this:
[img src="[http://i955.photobucket.com/albums/ae36/c3silentk/Tutorial3.jpg]"]
Next, right click on "elite commander plasma rifle.actor_variant" and choose "Extract to..." it should open a window. MAKE SURE IT IS SET UP LIKE THIS!
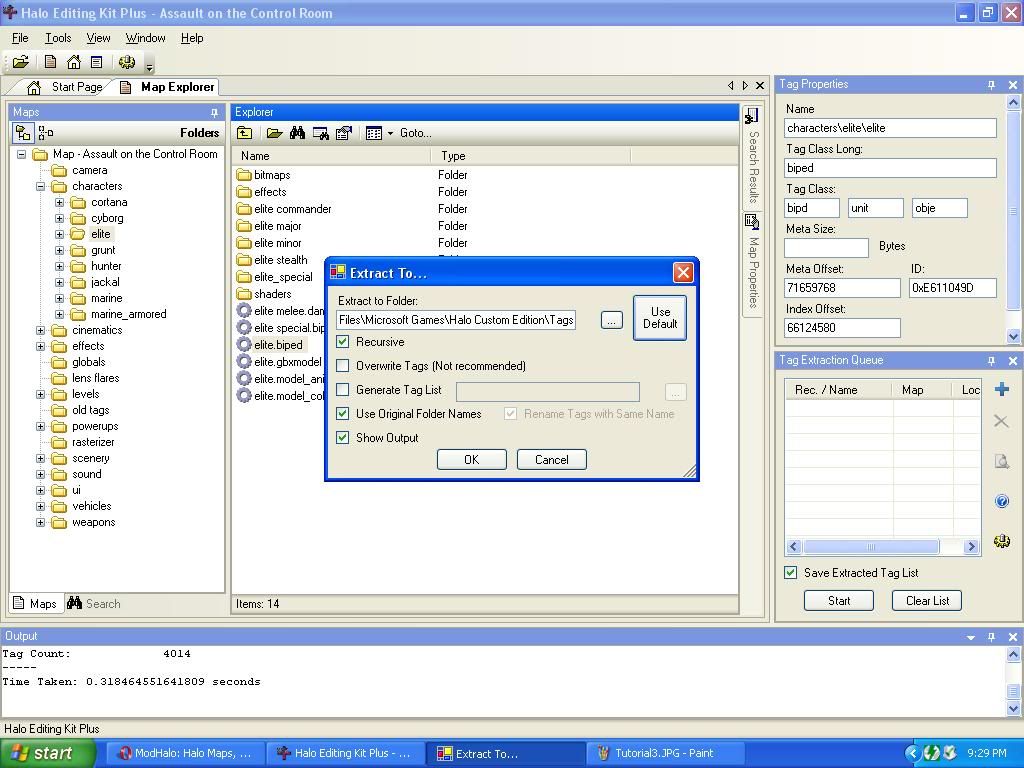
Also, MAKE SURE YOU PRESS "Use Default"! Then just click OK.
Wait till it's done and then close HEK+
Here comes the real fun...
STEP THREE: Sapien!
For this step we are going to be actually inserting the tag into the map as a pointer so it will include it in the build and place it on the map.
For starters, you may need to open sapien. It will bring up a browsing box. Browse to "C:\Program Files\Microsoft Games\Halo Custom Edition\tags\levels\test\NameOfMPMap" if you don't see a "Mapname.scenario" (E.G:"Bloodgulch.scenario") then you need to follow my first tutorial on extracting your map right. If you DID follow the tutorial you should see this:
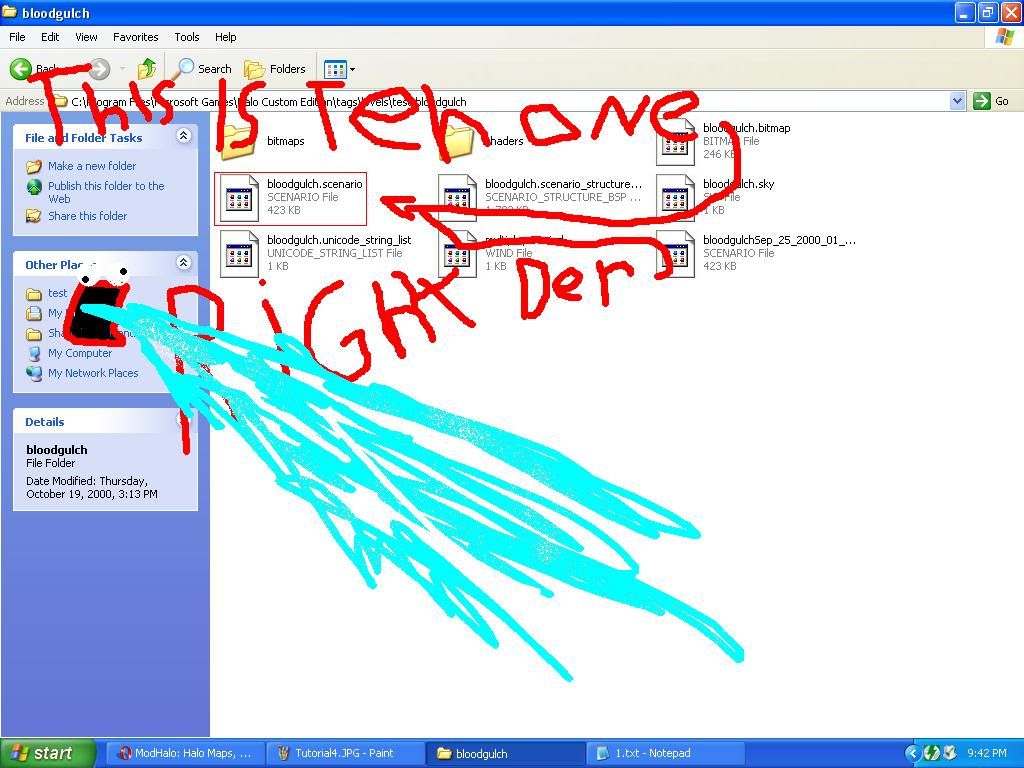
Just double click on "Yourmapname.scenario". It should go white for a while and then open with four windows. A 3D game view, a properties box, a hierarchy window, and another window nobody ever uses.
What you're looking for is this button right here:
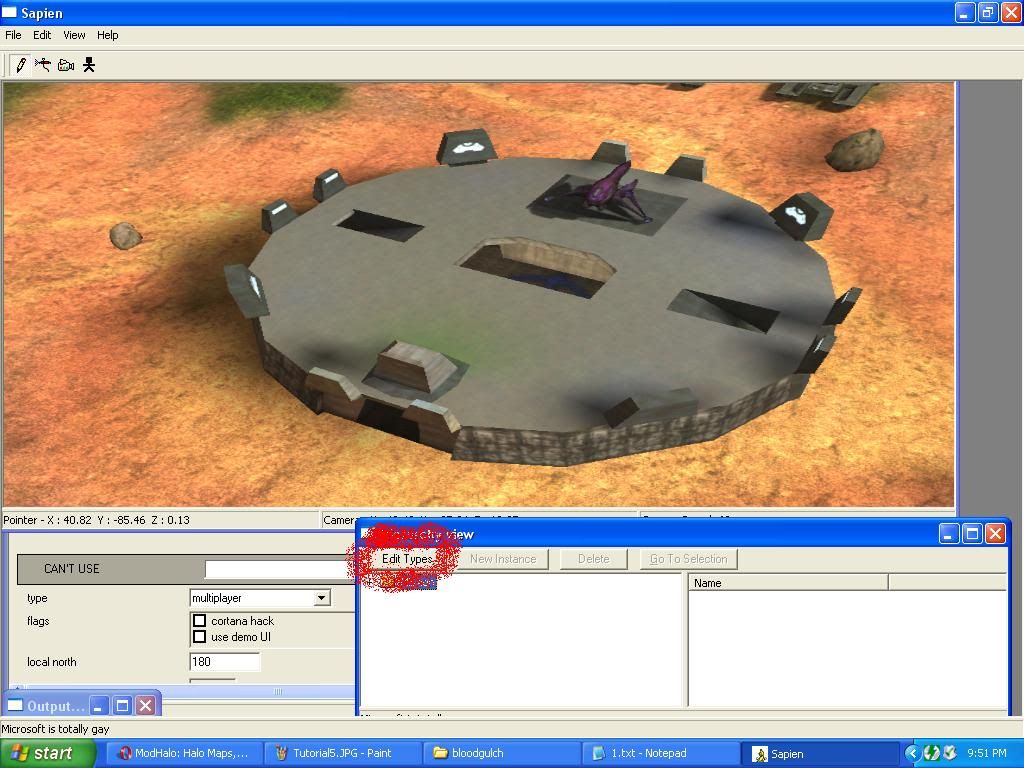
Once clicked you should see a window pop up. Now click the drop down box and choose what you want to inject. In this case we are injecting an AI so choose "Actor Variant"

As you should well see, it is currently empty. Lets fix that right now! Click on the "Add" button and it will open a browse box. The root it starts in is "C:\Program Files\Microsoft Games\Halo Custom Edition\tags"
Browse through to "characters\elite\Elite commander" and you should see the tags you extracted. Ignore the ones you don't have in this pic, those are extras of mine.
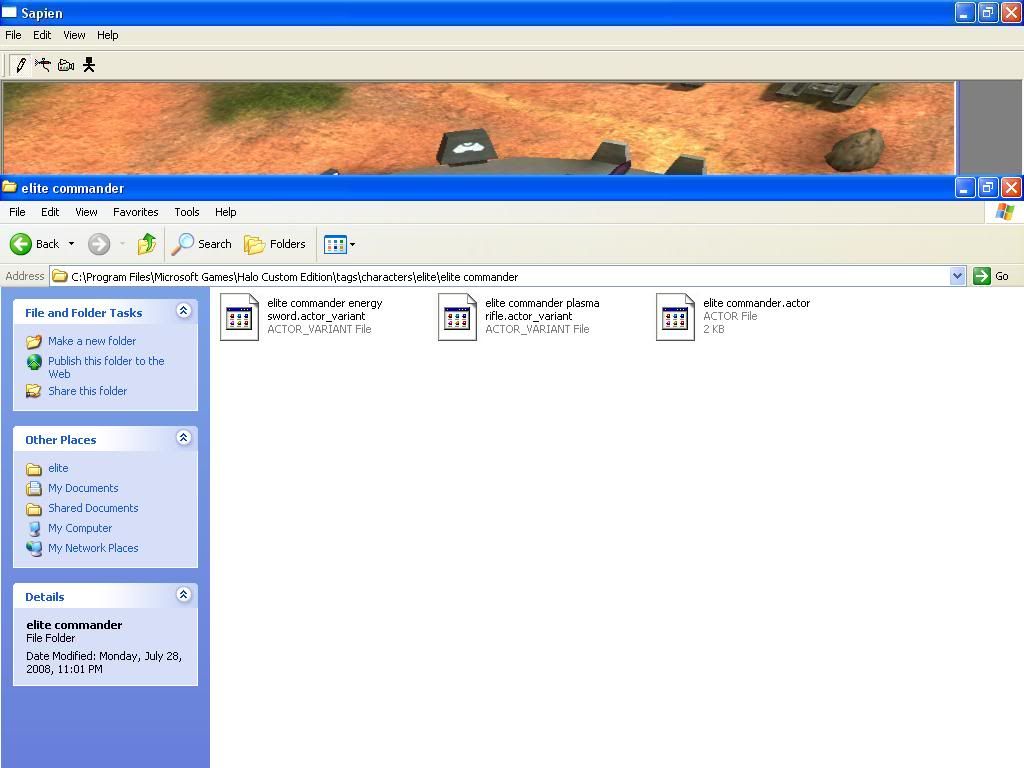
Now double click "elite commander plasma rifle.actor_variant". If all goes smoothly it should go back to the adding window and show the elites tag in there now. If not, post here and I will try to help you out. Now that we have a pointer to include the elite in the build we need to add him on the map
STEP FOUR: Placement!
Now we are going to place our AI on the map using "Encounters"
Click the plus sign next to mission to open the tag section. Now browse through those to "AI" then click on "Encounters". Now, click the "New instance" button and it should look like this:
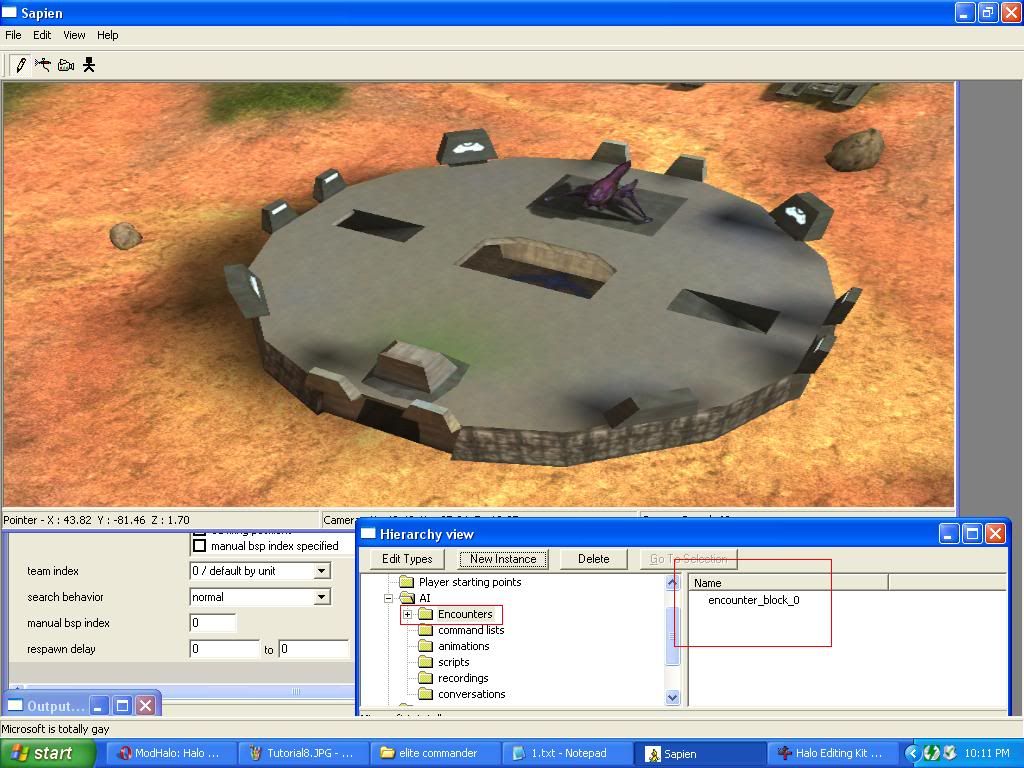
Click on "Encounter_Block_0" on the right window and then bring up the properties window. That is, this one here:
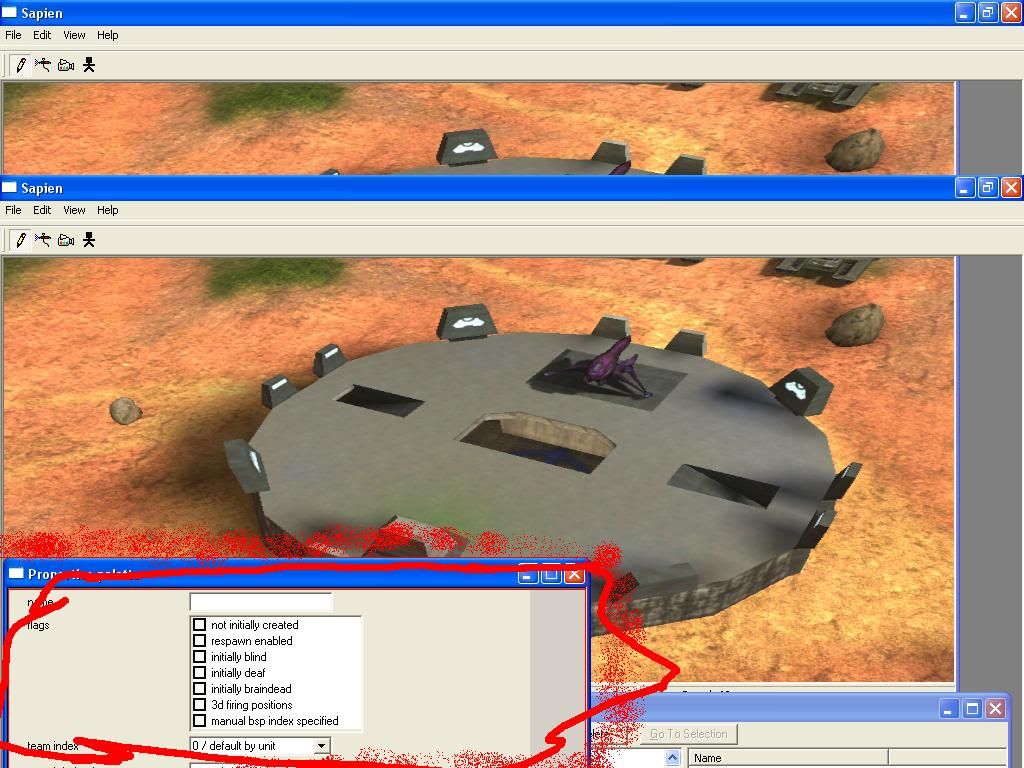
Make the window larger if you want. Change the values to these:
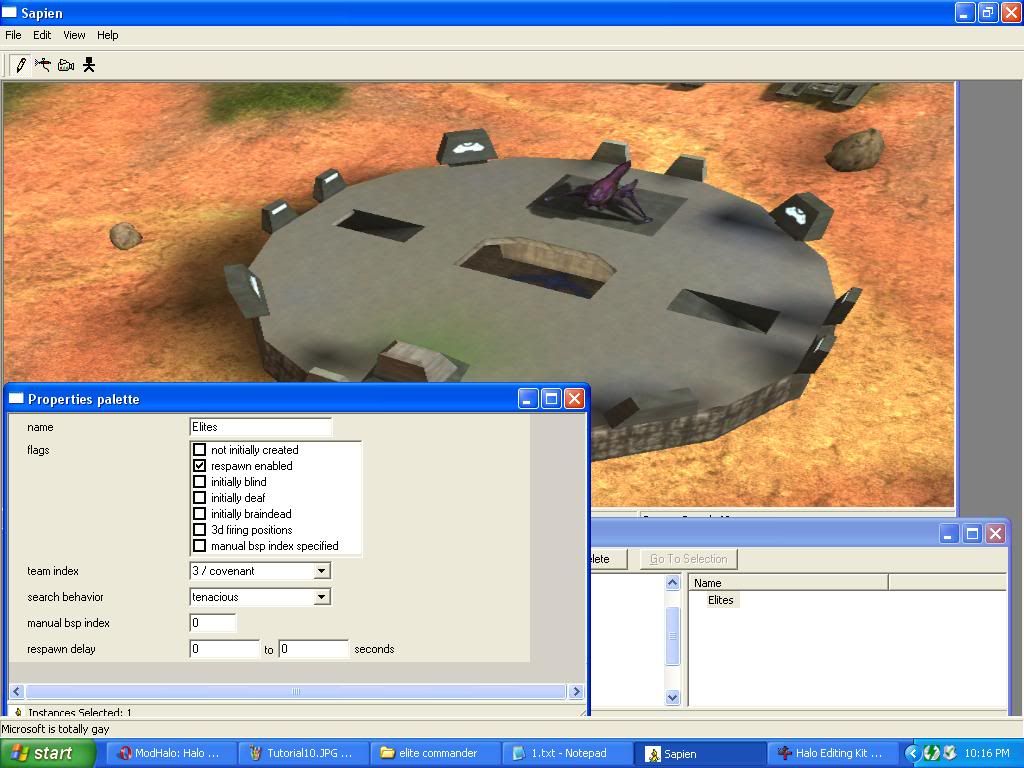
Now go back to the Hierarchy window and click the plus next to "Encounters" and then click the plus next to "Elites". It should then look like this:
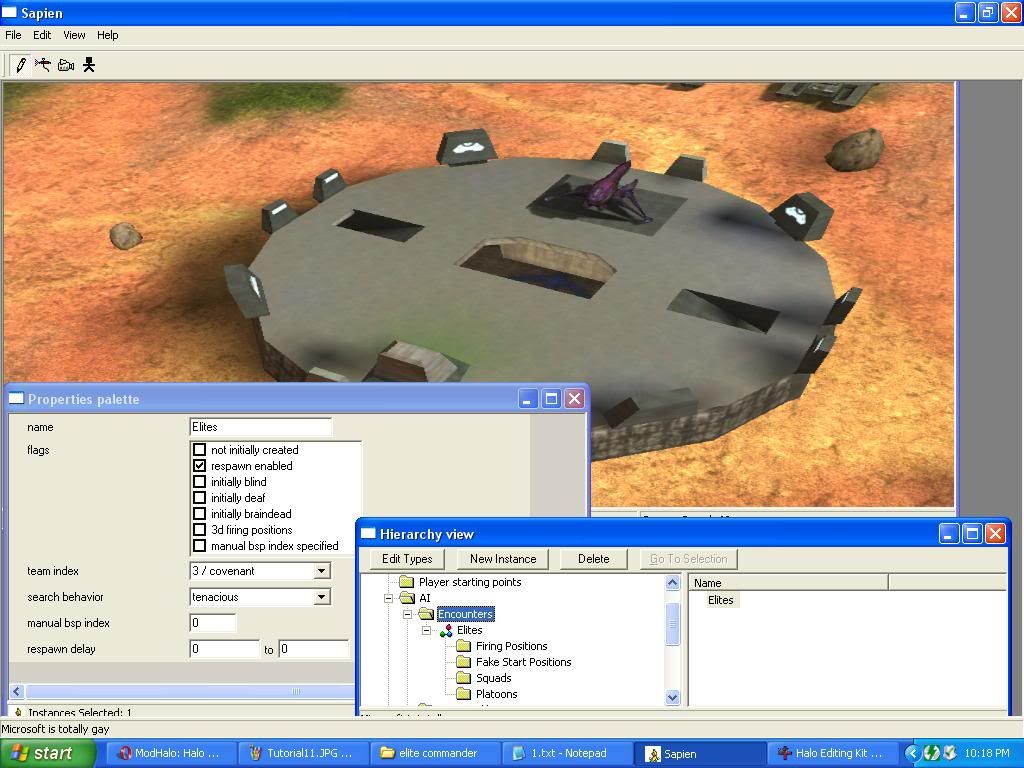
Now click on "Squads" and press "New Instance". You should get this:
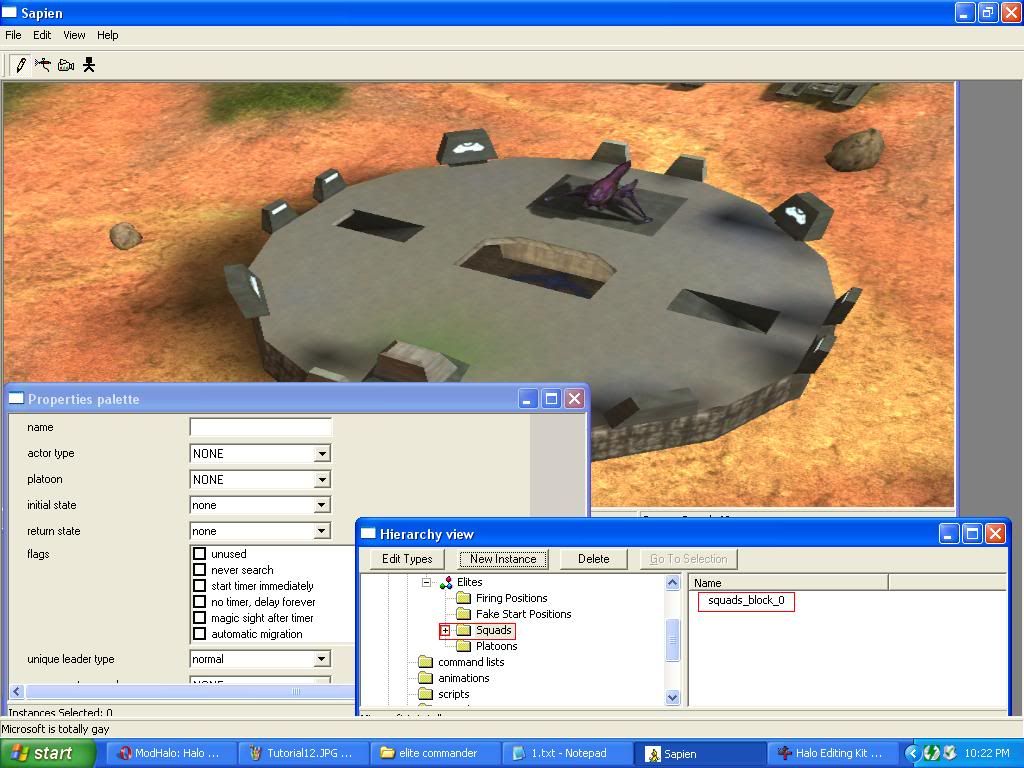
Click on "Squads_Block_0" on the right and switch to the properties view and set it up like this (this window scrolls BTW so you may have to scroll down to get all the settings. Maximize the properties if you need to.):
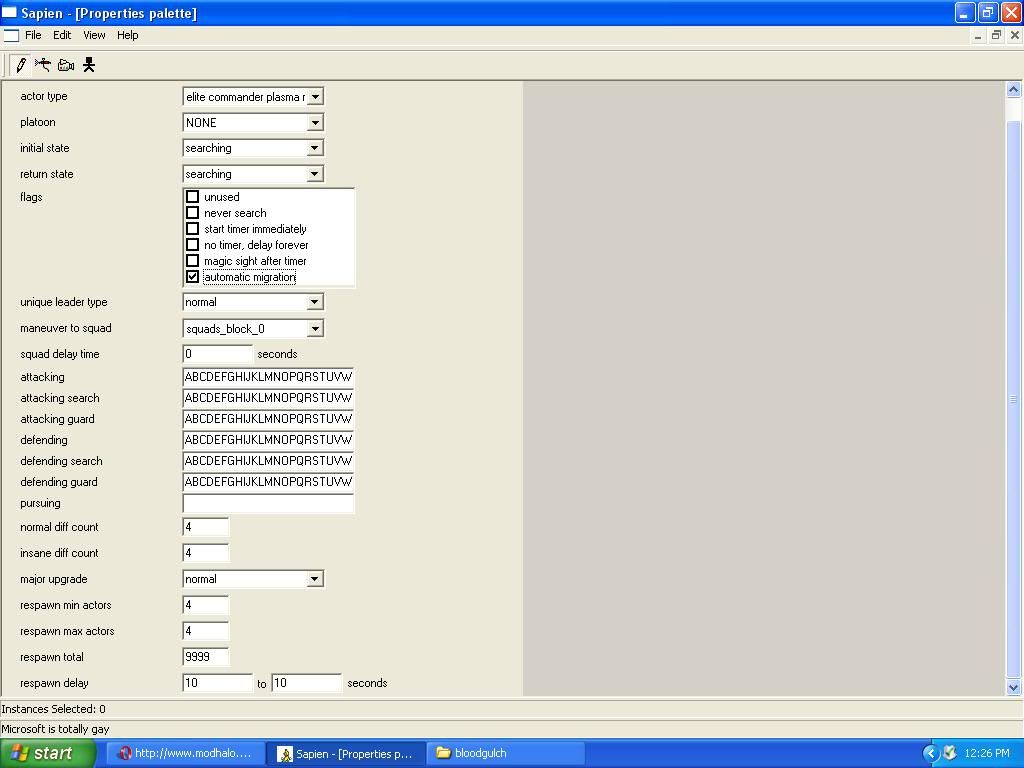
I maximized it for easy screenshotting, but if you don't want to, you don't need to. Also, the first value "Name" Doesn't really matter, its just for organizing or calling through scripting. "Normal diff count" "Insane diff count" "Respawn min" "Respawn max" and "Respawn total" are all about how many can be spawned at once. I chose five, but you can pick whatever you want.
Ok, now we have the tag added and a squad's properties set. All that is left is to place it on the map.
For this, go back to the 3D view and move to the Blue base (To move you need to hold down the middle mouse button and use WASD. Shift increases moving speed.) Once at blue base, we are going to set spawns. To do this we need to open the Hierarchy view and go to our squad and click on "Starting Locations".
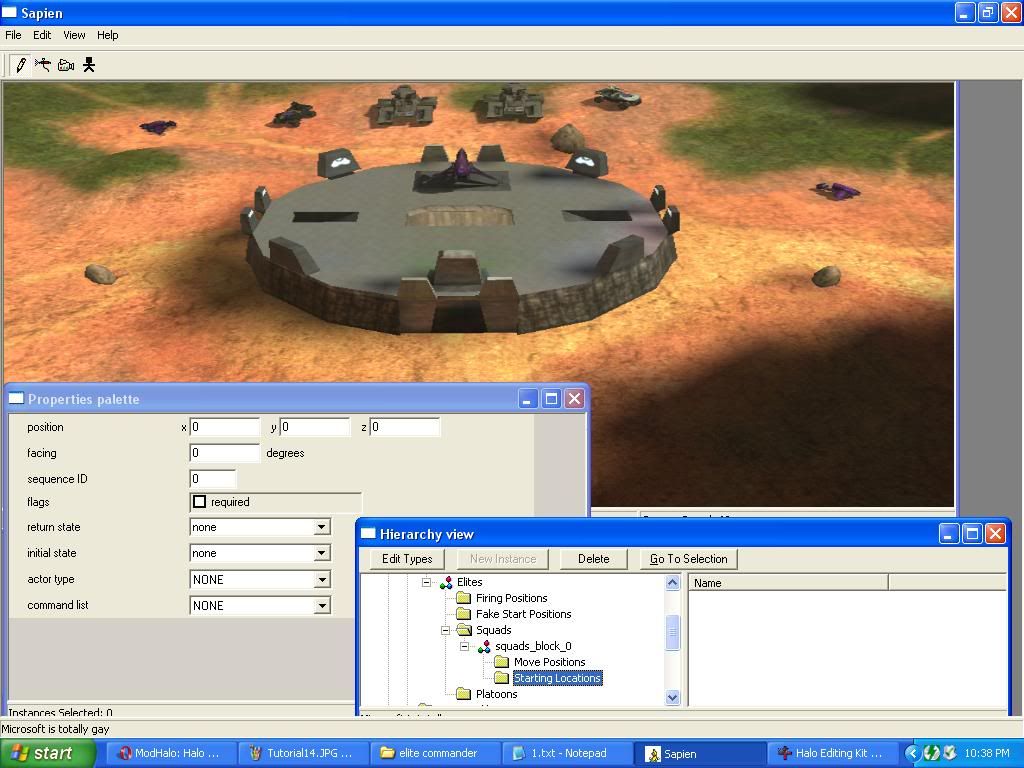
Notice how the "New instance" button is grayed out? Well, thats because you can't add a starting location without world coordinates. To place these we must use the 3D view. So click back over to your 3D view and right click to place some spawn points around the base (the minimum should be at least how many you set to spawn in squad properties). Alternatively, you can press spacebar to place spawns or objects directly where the camera is located currently. Once you place them it should look like this:

The red, green, and blue arrows on the spawn stand for X, Y, and Z. If you don't understand this, thats okay. The green arrow just points to the way the AI will spawn facing.
Now if you want to see if you set it up right, go to the encounters section and click "New instance" and then click the new encounter and hit "Delete". It should reset the AI and spawn your placed AI at their spawn points. If they spawn, you have set up the squad settings right.
Ok, that should be it! You know have working AI placed! Now for the best part of all...
STEP FIVE: Rebuilding with TOOL.exe!
You see, in Halo CE, when you edit the maps in sapien, you haven't changed ANYTHING in the game yet. You have to rebuild the tags into a .map file again for it to show up in CE. To do this, we have a nifty little tool called, well... tool! This isn't the average program, as in, it runs on the command line. It has no user interface whatsoever. To use it we have to press Start > Run Once you've done that, type cmd in the box. It should open up a black box like this:
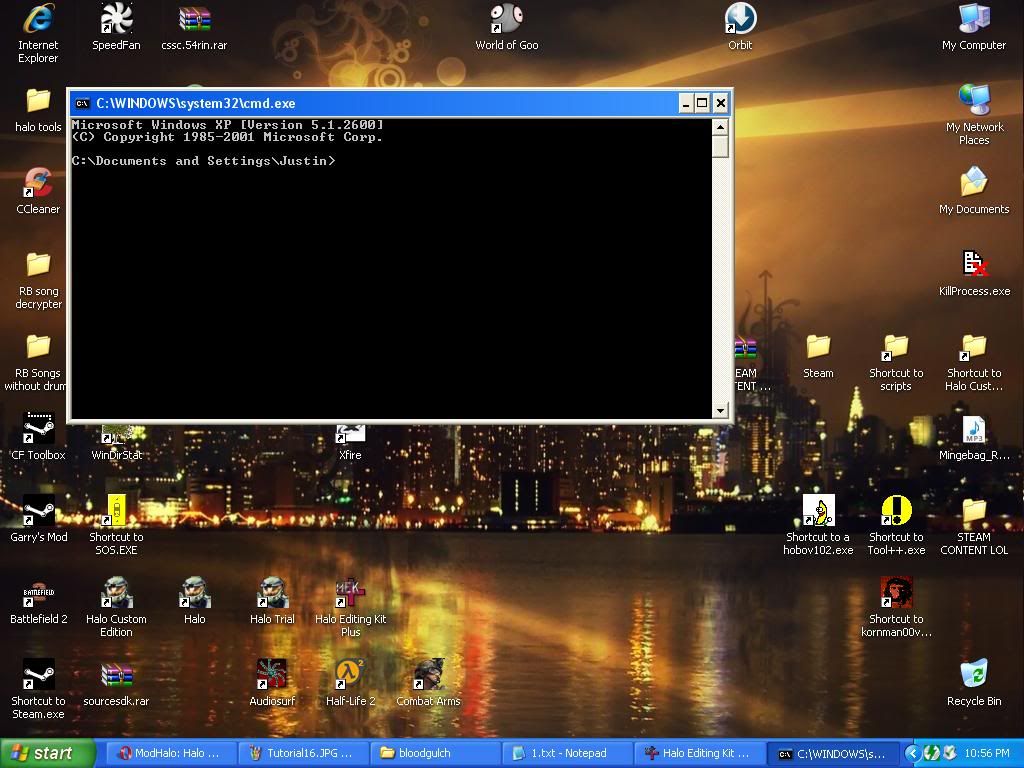
In this box, type "chdir C:\Program Files\Microsoft Games\Halo Custom Edition" if your Halo CE is installed on a drive with a different letter or in a different directory, you will need to change that line a little bit, but I'm sure you'll get it right.
Next, make sure sapien is closed (and your map is saved). Then, you need to type out this exact command (for bloodgulch. If using another map, substitute its name here) "tool build-cache-file levels\test\bloodgulch\bloodgulch"
You should get a readout like this:
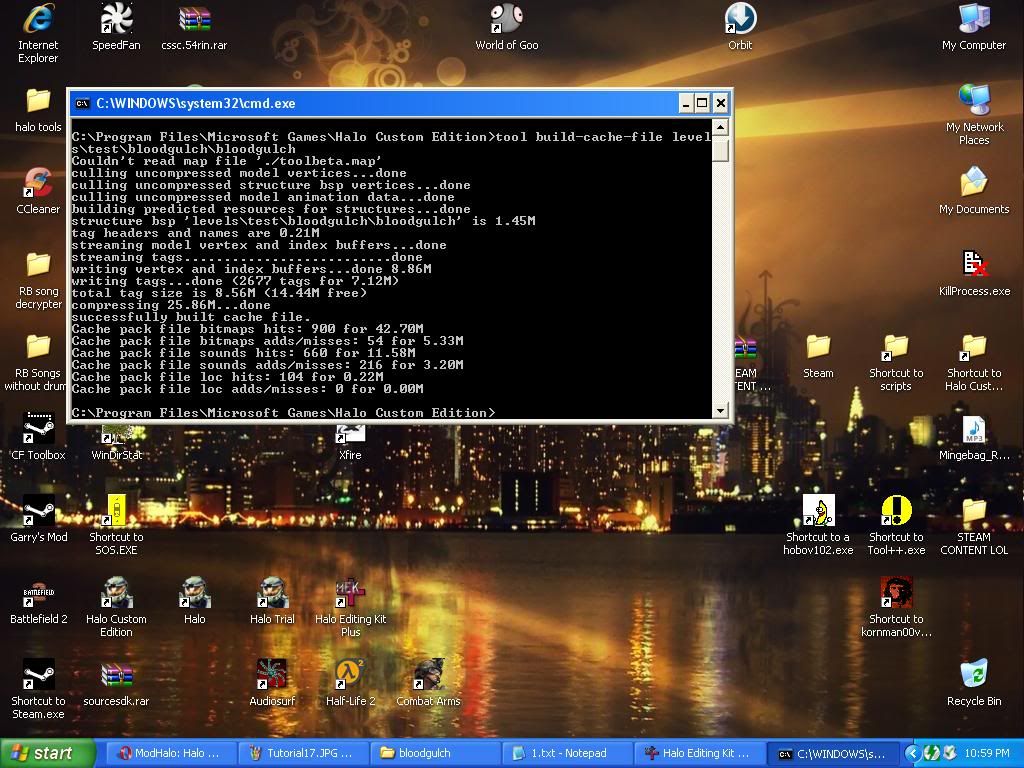
If you have some kind of compiling issue just post it here.
Ok! Your mod has been built into Bloodgulch.map and is ready to be run! Go ahead, give Halo CE a run and check out Bloodgulch! The AI should move around and shoot at you!
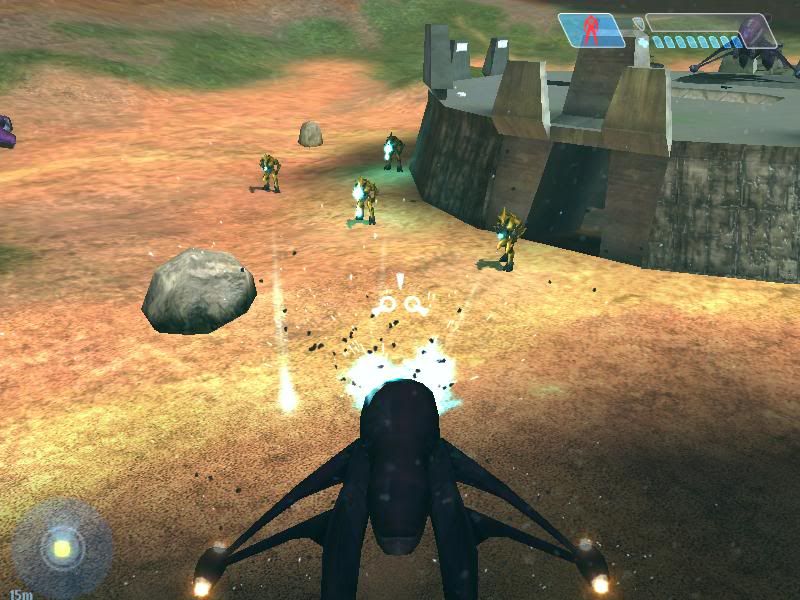
If you want them to get in vehicles, move to certain points, ETC that will be in my next tutorial on scripting and command lists!
Comments highly welcome!
Anyways, if you haven't done my first tutorial, or at least extracted the tags you needed, this will not work.
STEP ONE: Preperation!
Ok, for step one open HEK+ The download link for this program is included in my other tutorial (I think), or get it HERE.
You should see something like this:

STEP TWO: Extraction!*
(*Optional step: if you are making/downloading your own tags, or have already extracted AI, skip this)
Ok, now we need to extract what we want to inject into our vanilla Halo map. THIS ONLY NEEDS TO BE DONE ONCE! Unless you screw up the tag and want to re-extract. If you already extracted the tags or you downloaded the tags, skip this whole step entirely.
So, to do this it is almost exactly the same as my other tutorial, if you don't want to go read it I will show how here. First, hit File > Open and browse to the HALO PC DIRECTORY! NOT CE! and choose the single player map that has the things you want in it. Once open, it should look almost exactly like this:

Now browse to what item you want. For this tutorial we will extract a simple Elite AI for our map. Browse to "Characters\Elite\Elite commander" so it looks like this:
[img src="[http://i955.photobucket.com/albums/ae36/c3silentk/Tutorial3.jpg]"]
Next, right click on "elite commander plasma rifle.actor_variant" and choose "Extract to..." it should open a window. MAKE SURE IT IS SET UP LIKE THIS!

Also, MAKE SURE YOU PRESS "Use Default"! Then just click OK.
Wait till it's done and then close HEK+
Here comes the real fun...
STEP THREE: Sapien!
For this step we are going to be actually inserting the tag into the map as a pointer so it will include it in the build and place it on the map.
For starters, you may need to open sapien.
 It will bring up a browsing box. Browse to "C:\Program Files\Microsoft Games\Halo Custom Edition\tags\levels\test\NameOfMPMap" if you don't see a "Mapname.scenario" (E.G:"Bloodgulch.scenario") then you need to follow my first tutorial on extracting your map right. If you DID follow the tutorial you should see this:
Just double click on "Yourmapname.scenario". It should go white for a while and then open with four windows. A 3D game view, a properties box, a hierarchy window, and another window nobody ever uses.
What you're looking for is this button right here:

Once clicked you should see a window pop up. Now click the drop down box and choose what you want to inject. In this case we are injecting an AI so choose "Actor Variant"

As you should well see, it is currently empty. Lets fix that right now! Click on the "Add" button and it will open a browse box. The root it starts in is "C:\Program Files\Microsoft Games\Halo Custom Edition\tags"
Browse through to "characters\elite\Elite commander" and you should see the tags you extracted. Ignore the ones you don't have in this pic, those are extras of mine.

Now double click "elite commander plasma rifle.actor_variant". If all goes smoothly it should go back to the adding window and show the elites tag in there now. If not, post here and I will try to help you out. Now that we have a pointer to include the elite in the build we need to add him on the map
STEP FOUR: Placement!
Now we are going to place our AI on the map using "Encounters"
Click the plus sign next to mission to open the tag section. Now browse through those to "AI" then click on "Encounters". Now, click the "New instance" button and it should look like this:

Click on "Encounter_Block_0" on the right window and then bring up the properties window. That is, this one here:

Make the window larger if you want. Change the values to these:

Now go back to the Hierarchy window and click the plus next to "Encounters" and then click the plus next to "Elites". It should then look like this:

Now click on "Squads" and press "New Instance". You should get this:

Click on "Squads_Block_0" on the right and switch to the properties view and set it up like this (this window scrolls BTW so you may have to scroll down to get all the settings. Maximize the properties if you need to.):

I maximized it for easy screenshotting, but if you don't want to, you don't need to. Also, the first value "Name" Doesn't really matter, its just for organizing or calling through scripting. "Normal diff count" "Insane diff count" "Respawn min" "Respawn max" and "Respawn total" are all about how many can be spawned at once. I chose five, but you can pick whatever you want.
Ok, now we have the tag added and a squad's properties set. All that is left is to place it on the map.
For this, go back to the 3D view and move to the Blue base (To move you need to hold down the middle mouse button and use WASD. Shift increases moving speed.) Once at blue base, we are going to set spawns. To do this we need to open the Hierarchy view and go to our squad and click on "Starting Locations".

Notice how the "New instance" button is grayed out? Well, thats because you can't add a starting location without world coordinates. To place these we must use the 3D view. So click back over to your 3D view and right click to place some spawn points around the base (the minimum should be at least how many you set to spawn in squad properties). Alternatively, you can press spacebar to place spawns or objects directly where the camera is located currently. Once you place them it should look like this:

The red, green, and blue arrows on the spawn stand for X, Y, and Z. If you don't understand this, thats okay. The green arrow just points to the way the AI will spawn facing.
Now if you want to see if you set it up right, go to the encounters section and click "New instance" and then click the new encounter and hit "Delete". It should reset the AI and spawn your placed AI at their spawn points. If they spawn, you have set up the squad settings right.
Ok, that should be it! You know have working AI placed! Now for the best part of all...
STEP FIVE: Rebuilding with TOOL.exe!
You see, in Halo CE, when you edit the maps in sapien, you haven't changed ANYTHING in the game yet. You have to rebuild the tags into a .map file again for it to show up in CE. To do this, we have a nifty little tool called, well... tool! This isn't the average program, as in, it runs on the command line. It has no user interface whatsoever. To use it we have to press Start > Run Once you've done that, type cmd in the box. It should open up a black box like this:

In this box, type "chdir C:\Program Files\Microsoft Games\Halo Custom Edition" if your Halo CE is installed on a drive with a different letter or in a different directory, you will need to change that line a little bit, but I'm sure you'll get it right.
Next, make sure sapien is closed (and your map is saved). Then, you need to type out this exact command (for bloodgulch. If using another map, substitute its name here) "tool build-cache-file levels\test\bloodgulch\bloodgulch"
You should get a readout like this:

If you have some kind of compiling issue just post it here.
Ok! Your mod has been built into Bloodgulch.map and is ready to be run! Go ahead, give Halo CE a run and check out Bloodgulch! The AI should move around and shoot at you!

If you want them to get in vehicles, move to certain points, ETC that will be in my next tutorial on scripting and command lists!
Comments highly welcome!
